


6 Things You Didn’t Know You Could Do On Google Calendar On Android : Instead of being a practical tool for organizing your daily schedule, the paper calendar hanging in your room likely serves more as a decorative item, with occasional use for checking important dates like your dad’s birthday. On the other hand, many individuals opt for digital calendars for managing their schedules, and with good reason. Digital calendars offer accessibility from anywhere, enabling you to effortlessly view your agenda and add new appointments and tasks while on the move. Additionally, digital calendars provide enhanced functionality such as the ability to invite others to online meetings and attach relevant files to events.
Among the array of calendar applications available for Android devices, Google Calendar stands out as one of the finest and arguably the most widely used. Its user-friendly interface simplifies the process of creating events and tasks. However, to fully utilize the app’s potential, familiarizing yourself with certain Google Calendar features is advisable.
Handy gestures
Navigating Google Calendar doesn’t have to involve tediously scouring through menus and buttons, not when you can use handy gestures to accomplish tasks in no time. Here’s a rundown of some of the time-saving gestures for Google Calendar:
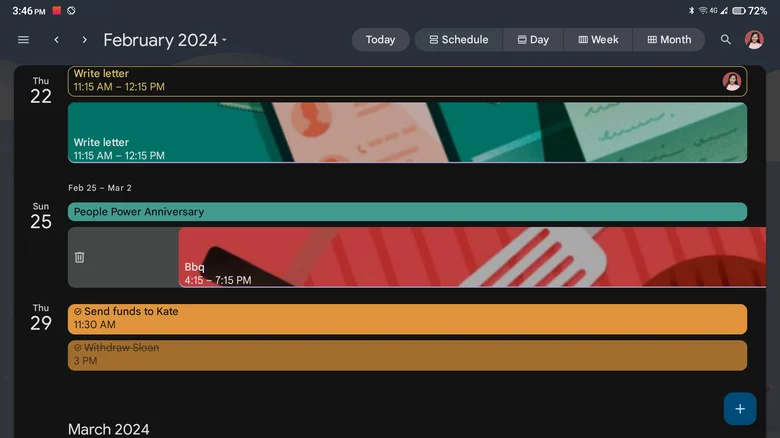
- Swipe to delete: Normally, to delete an existing event, you need to first open its info page, tap on the more icon, and select Delete. But you can simply swipe right on the event in the Schedule view to remove it instantly.
- Zoom in to condense and expand the timeline: Sometimes, you want to see a broad overview of your day, and other times, you just want to focus on events from 7 a.m. to 12 p.m. It’s easy to change the timeline displayed by zooming in and out on the screen while you’re in the Day and Week views.
- Tap on add event: Adding events is as easy as tapping on a specific date or time. Just switch to the Month, Week, or Day view and tap on the date or time you prefer. This action automatically opens the Add Event info page.
- Slide up or down to adjust the event’s time: Move the event’s start time by dragging and dropping the outline to your desired start time. Then, long-press the bottom outline and slide it up or down to your desired end time.
- Drag and drop to move events: No need to open your existing event just to reschedule it to a new time or date. All you need to do is go to your Day or Week view, long-press the event, drag it to the new schedule, and then drop it into place. Easy peasy.
Quick responses

There are times when you need to send an email to your colleagues before a scheduled meeting, perhaps to say you can’t make it or inform them of any last-minute changes in the agenda. However, if you initially scheduled the meeting directly in Google Calendar, you can’t send your guests an email without having to manually collect and type their email addresses. This, however, is prone to errors as you might overlook someone. Luckily, Google Calendar’s Quick Responses feature allows you to send an email to all the participants directly from the event. Here’s how to use it:
To access the specific event in Google Calendar, follow these steps:
- Open the Google Calendar app on your Android device.
- Find and tap on the event you wish to view.
- Look for the envelope icon next to the guest count and tap on it.
- Choose one of the four preset quick responses or tap “Write your own” to customize your message.
- You will be automatically redirected to the Gmail app with the recipients and subject line already filled in.
- Optionally, edit your response or add attachments as needed.
- Once you’re done, hit the “Send” button.
If you want to edit any of the prewritten responses, follow these additional steps:
- Open the Google Calendar app on your Android device.
- Tap the hamburger menu located in the top-left corner.
- Go to Settings > General.
- Scroll down to find “Quick responses” and tap on it.
- Select the prewritten message you wish to modify.
- Type your revised text.
- Press “OK” to save your changes.
Remember, the Quick Response feature is not exclusive to event organizers; even guests can send quick responses to the organizer and other participants.
Change the default color of events
It’s likely that you have multiple Google accounts linked to your Calendar: one for work-related engagements like client meetings and presentations, and another for personal commitments such as doctor appointments and social gatherings. While it’s convenient to have all your events and tasks in one place, it can also be confusing because events from different accounts are color-coded the same way by default. This can make it difficult to quickly differentiate between work and personal commitments. To avoid confusion and better organize your schedule, you can adjust the settings on Google Calendar to assign unique color schemes to each account. Here’s how to do it:
Here are the paraphrased instructions:
- Launch the Google Calendar app.
- Open the menu by tapping the icon with three horizontal lines located at the top left of the screen.
- Scroll down and select “Settings.”
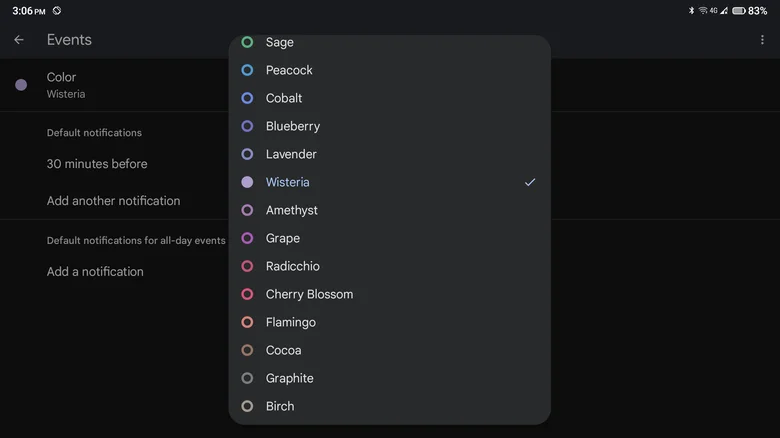
- Within the settings, navigate to Events > Color under your primary email account.
- Choose a color from the range of more than 20 options provided.
- Similarly, adjust the color settings for Tasks under the same email account. It’s advisable to select colors from the same palette for consistency. For instance, opt for Cherry Blossom for Events and Flamingo for Tasks for your primary email, as both are variations of pink.
- Repeat the aforementioned steps for your secondary email account. For the secondary email, select Pistachio for Events and Sage for Tasks, as they are both shades of green.
Duplicate events
Google Calendar offers a convenient function enabling you to repeat events at specified intervals, like every Tuesday and Sunday, or on the 20th of each month. Nonetheless, this feature caters only to regularly occurring activities. But what about events that lack a consistent pattern? Take, for instance, scheduling multiple performance reviews for your team around your existing commitments without a fixed recurrence.
In such scenarios, the typical approach involves creating the same event at an alternative time. However, this task can be tedious, particularly when you must attach files anew and re-enter email addresses for all attendees. To spare you from this inconvenience, you can opt to duplicate the existing event. Here’s how you can do it on Google Calendar:
- Start by creating your event on Google Calendar if you haven’t already.
- Open the event’s information page.
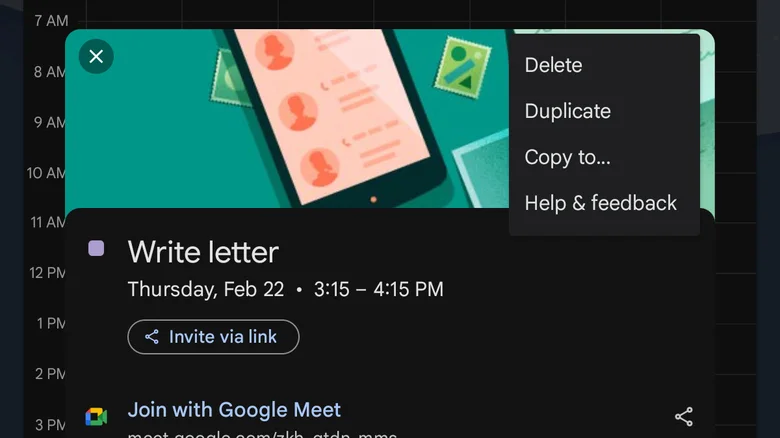
- Click on the three vertical dots (more icon) located at the upper right corner.
- Choose “Duplicate” from the menu.
- Optionally, adjust other event details such as the name, guests, and location as necessary.
- To set a new date and time for the duplicated event, you can:
- Directly tap on the date and time on the info page and select a new slot.
- Utilize the down arrow on the info page to display the calendar view, then drag and drop the event’s outline to your desired date and time.
- Finally, select the “Save” button to confirm the duplicated event.
Propose a new time
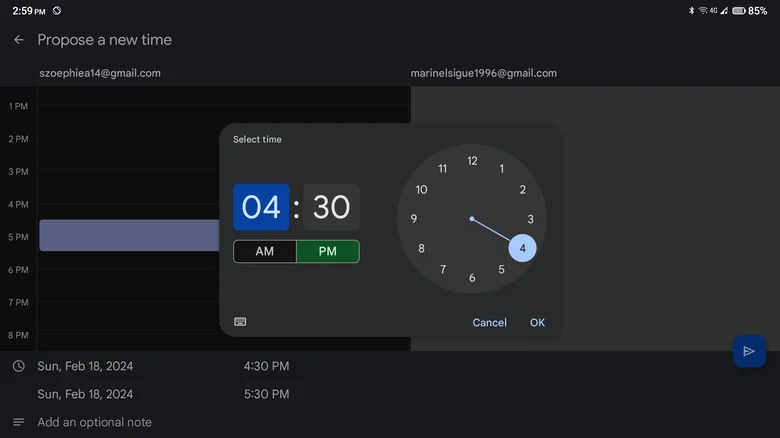
Given your busy schedule, there will likely be instances where a new event overlaps with a prior commitment that you’re unable to adjust. Your initial reaction might involve reaching out separately to the event organizer via email or another messaging platform to request a change in schedule. However, you can actually handle this directly within Google Calendar using the “Propose a new time” feature. Here’s a concise guide on how to propose a new time using the Google Calendar app:
- Find the event in question within Google Calendar.
- Scroll to the bottom of the event’s information page and tap the downward arrow next to the RSVP responses (Yes, No, Maybe).
- Choose “Propose a new time.”
- Modify the start date and time according to your availability.
- Adjust the end date and time as necessary.
- Optionally, add a note explaining your reason for suggesting a new schedule.
- Click “Send.”
- Select your RSVP response.
- Save your changes.
For the organizer:
- Open the email titled “Proposed new time: [event name].”
- Review the suggested time and any accompanying notes from the guest.
- If the proposed time works, click “Accept.” Your guests will receive an email notification regarding the schedule adjustment.
- If the proposed time isn’t suitable, you can either disregard the request or send a direct message to the guest to communicate your decision.
Allow guests to modify the event
Coordinating schedules can be challenging at times. While your contacts can suggest alternative dates and times for an event, you need to take the time to review and approve these proposals before the event schedule is altered. However, if you prefer instant implementation of proposed changes without your confirmation, Google Calendar offers a convenient feature that allows guests to modify events directly. This enables them to freely edit event details, with updates taking effect immediately. To activate this feature, follow these steps:
- Create a new event on your calendar.
- Provide event details.
- Enter the email addresses of your intended guests.
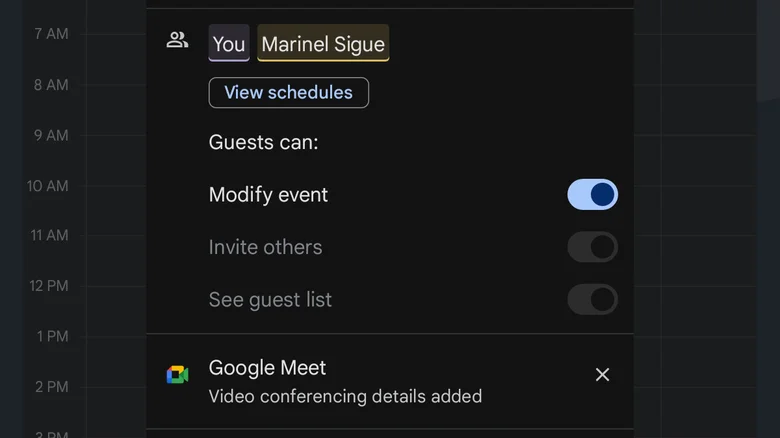
- Click on the “Guests can:” section.
- Turn on the “Modify event” toggle.
- If you prefer to limit guests’ authority, you can leave the “Modify event” option off and simply enable “Invite others” to allow guests to add more participants. You can also enable “See guest list” to let guests view who else is invited.
- Save your event.
- To notify participants via email, click Send on the popup.
For guests:
- Edit an event by opening it on your Google Calendar.
- Select the pen icon at the top.
- Adjust event details as needed.
- Save your changes.
- Notify other participants of the updated details by clicking Send on the popup to send an email notification.